How to Use Tarps of Roof Leaks Fixes
Whether your roof sprung a leak after a summer rain, or was damaged during a storm, follow these easy steps to install a roof tarp until you arrange repairs.
Tropical cyclone season’s here, bringing with it the possibility of violent storms, tornados, and heavy rain. Wind can snap trees like match sticks, and turn ordinary objects into projectile missiles.
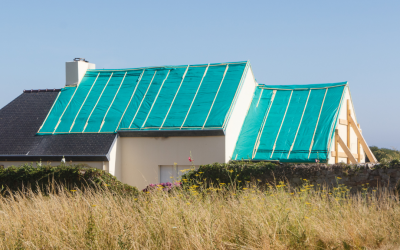
If your roof is harmed during a storm, you can prevent further property damage by temporarily protecting your home with a heavy duty roof tarp. It will keep your valuables inside dry until you can make arrangements for permanent repairs.
Tools You Will Need for Installing a Roof Tarp
To install a roof tarp properly, you’ll need the following:
>> Sturdy ladder
>> Slip-resistant shoes
>> Waterproof roof tarp
>> 6 wooden 2x4s (each as long as the tarp’s width)
>> Carpenter’s stapler
>> 8 3-inch common nails
How To Tarp Your Roof?
A few warnings first:
- Do not attempt to install a roof tarp during dangerous or windy weather.
- Call for professional help if your roof has a steep pitch, because you could fall.
- Remember that roof tarps are slippery, even when dry…so never step on one.
- And, as with most things in life, installing a roof tarp is easier to do with a little help from a friend.
Follow these 8 Easy Steps to Protect Your Home with a Roof Tarp:
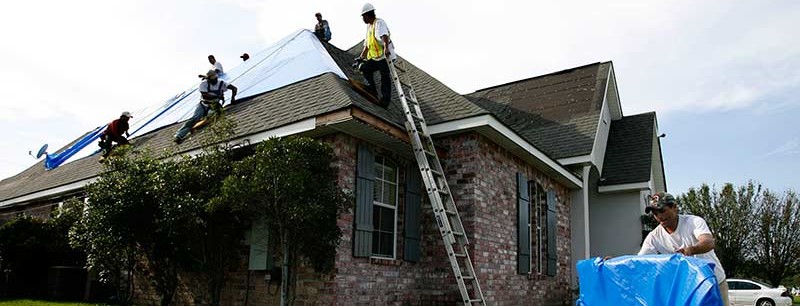
- Use a sturdy ladder to access the damaged area of your roof. Make sure to wear shoes with slip-resistant soles.
- From the eaves of the roof, unroll part of the tarp up to the roof peak, covering the damaged area.
- Wrap one end of the roof tarp twice around a 2×4 wooden board that’s as long as the tarp is wide.
- Using a carpenter’s stapler, staple the tarp to the board that you’ve just wrapped so it’s secure.
- Along both sides of the roof tarp, lay down a 2×4 board along the length. One end of each of the two boards should be in contact with the tarp-covered wooden board.
- Nail each of the 2x4s to the tarp-covered board. Don’t nail anything to the roof itself! Use two 3-inch nails to secure each of the 2x4s to the tarp-wrapped wood.
- Now lay out the other half of the roof tarp so it stretches over the ridge of the roof and goes down the other side.
- Repeat the process with the other side of the tarp.
Nobody wants to have to use a roof tarp, but you should always hope for the best, and plan for the worst! Know where to turn when you’re in need…and when you need a roof tarp, visit Tarp Hire Australia.
You can rent one online, and it’ll be delivered in just hours.